

- Export tumblr posts in HTML


- Turn the HTML file created into a XML
Once you done with Export, you need now to convert the HTML into a XML file in order to be imported into Blogger platform. Again, I guess there would be various tools available on the web; I personally used the "Wordpress2Blogger Application", uploaded my HTML file and got back an XML file.
- Log into Blogger and create a new user, if you don't have one yet. Create your new blog.
- Import the XML file into Blogger
From your Blogger dashboard, click on Settings--> Other --> Import Blog and upload the XML file that you have hopefully saved somewhere in your local machine. I recommend keeping a backup copy of both your HTML and XML files in your local machine or better on the web. You might need it in the future.In my case, all posts were imported fine except for some videos for which I had to review links and titles (some tumblr post types did not have titles). My recommendation is to manually check each post for errors/wrong format you might have incurred during your migration process.
- Set up your new Design on Blogger
At this point hopefully all your posts have been correctly imported into Blogger, and are ready to be published. Almost ready, actually. It's at this point that you might want to review your blog design, template and look of your posts.You can do all of this from your main dashboard. Go to Layout and play a bit with the gadgets. Remember that, in addition to the default gadget available from Blogger, you can create/add your own gadget. Just click on Add Gadget--> HTML/JavaScript and insert/paste the correspondent code. You can find plenty of nice gadgets on the web, such as "About me" or "Twitter" widgets.
- (Optional) Submit your Custom Domain on blogger, if you have one
If you have a custom domain and want to use it for your new blog on blogger, you can. Blogger offers two publishing options for your blog: hosting on Blogspot (example.blogspot.com) and hosting on your own custom domain (www.example.com).In my case I wanted to use a custom domain I previously registered. What I did was:
a) Set my custom domain as default domain on Blogger: from the dashboard, go Setting-->Basic-->Publishing and enter the domain address you like to use;
b) Configure DNS on my domain provider website.
- Fix duplicated content
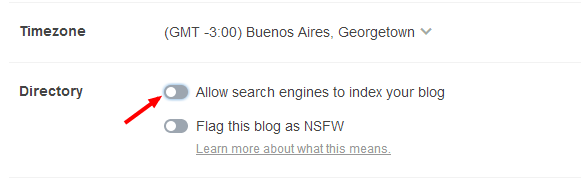
I believe this is an important aspect to keep in mind, when migrating your content from one platform to another one. Google don't like duplicated content and actually penalize it. To avoid your blog being penalized (I mean penalize your ranking on search engine results), I think a savvy solution is to use 301 redirects on your old blog platform: these redirects send visitors and search engines crawlers to your new domain and make it very clear which URL should be indexed. Another option to manage the duplicated content issue, could be also hiding your old Tumblr blog from search engine. I am not sure if this is a valid solution, but it is certainly faster. From your Tumblr dashboard, go to Settings--> click on your blog avatar--> scroll down to Directory and make sure the option "Allow search engines to index your blog" is not active.
Whichever option you decide to take, you should be able to keep your old Tumblr blog and do not need to delete it.
- Publish your Posts
Once you have double checked this and decide to go live with all your posts on Blogger, simply click "Publish" on the Posts menu. The posts will be published with the original date (dates of posts are imported too within the XML file).
- Submit the new Sitemap to Google and other Search Engines
a Sitemap is a list of the pages on your website, like a table of contents showing the structure of your blog. Creating and submitting a Sitemap helps make sure that search engines (Google, Bing, etc.) crawl and index your blog/website properly.
- To create a Sitemap for Blogger and submit to Google.
Add this string "atom.xml?redirect=false&start-index=1&max-results=500" next to your blog URL as below:
http//umakeimoney.blogspot.com/atom.xml?redirect=false&start-index=1&max-results=500
By doing this, you have just created a Sitemap for your new Blogger blog. What you need to do next is tell search engines (Google) about your Sitemap so that they will know the structure. For Google, you can submit the Sitemap to Google Web Master Tools
- Log into Webmaster Tools and click on your blog/website (add it if you can't see it). Then go to Sitemaps--> Add/Test Sitemaps and submit it. In the blank field, You just need to enter this string: atom.xml?redirect=false&start-index=1&max-results=500
Remember, this Sitemap submission was valid for Google. If you want to submit it to other search engines, you should do it through their appropriate tools. For example, for Bing you will submit it to Bing Webmaster tools.
- Install Google Analytics
Now that your new Blogger blog is live, it´s time to measure its performance. Is it receiving traffic? Where does it come from? Which posts are engaging more your readers? These are all very important questions you should start asking yourself, in order to optimize your blog. A very popular tool for tracking your Blogger traffic and answering the above questions is Google Analyics (from now on all websites will actually have installed Universal Analytics, but no worries the basic implementation process is the same). Installing it it's very easy:1) Create a Google Analytics account, if you don´t have one yet.
2) Create a new property for your blog: you will get a traking code. To install it in Blogger, you actually don´t need the entire java script code, but just the Web Property ID (the UA code).
3) From your Blogger dashboard, go to Settings-->Other--> Google Analytics and enter there your Web Property ID.
Once completed the above steps, you should see data in your Analytics account within 24 hours.


0 comments:
Post a Comment